Cara File Sharing Menggunakan Samba Dari Linux Ke Windows Dan Sebaliknya
Cara File Sharing Dari Linux Ke Windows Menggunakan Samba Server - Bagaimana cara kita untuk bisa akses file kita yang ada di folder linux ataupun file kita yang ada difolder windows kita? Dilinux kalian bisa melakukan file sharing atau share file atau folder dengan menggunakan samba.

Disini saya menggunakan sistem operasi armbian ubuntu bionic dan ingin melakukan file sharing ke windows 7 cara ini bisa diterapkan ke windows 8 dan juga windows 10, mungkin tetapi untuk di windows xp caranya akan sedikit berbeda.
Cara ini saya gunakan nantinya akan mengirim sebuah file info.php yang gimana file tersebut menjadi sebuah file uji coba untuk mengetahui apakah php di server linux kita sudah berjalan atau belum dan selanjutnya lanjut ke cara konfigurasi DNS Server dan juga konfigurasi web server.
Sistem operasi armbian saya di install di stb b860h versi 2 yang memiliki ram 2GB, jika kalian penasaran dengan bagaimana cara kita bisa menginstall linux di STB Bekas milik indihome ini yaitu stb b860h, kalian bisa baca artikel cara install armbian di linux di blog ini. (Baca juga: Cara install armbian linux di STB ZTE B860H Bekas Indihome).
Selain di armbian linux, konfigurasi file sharing ini bisa dilakukan di distro linux lainnya ko, seperti ubuntu, mint, debian, kali linux dll.
Cara File Sharing Linux Ke Windows Dan Sebaliknya Menggunakan Samba Server

apt-get update
Seperti gambar dibawah ini.

apt-get install samba
Seperti gambar dibawah ini.

cd /etc/samba
Jika kalian sudah masuk kedalam folder samba, kalian ketikan ls untuk melihat isi direktori nya atau isi foldernya, gambar outputnya akan seperti gambar dibawah ini.
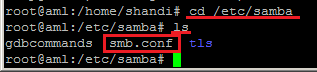
Nah seperti gambar diatas, kita lihat didalam folder samba ini terdapat file smb.conf langkah selanjutnya kita akan melakukan konfigurasi dengan mengedit file smb.conf nya, masukan perintah dibawah ini untuk melakukan konfigurasi file sambanya.
nano smb.conf
Saat kalian sudah mengetikan perintah diatas dan menekan enter, selanjutnya akan muncul banyak output, seperti dibawah ini.
#
# Sample configuration file for the Samba suite for Debian GNU/Linux.
#
#
# This is the main Samba configuration file. You should read the
# smb.conf(5) manual page in order to understand the options listed
# here. Samba has a huge number of configurable options most of which
# are not shown in this example
#
# Some options that are often worth tuning have been included as
# commented-out examples in this file.
#  - When such options are commented with ";", the proposed setting
#    differs from the default Samba behaviour
#  - When commented with "#", the proposed setting is the default
#    behaviour of Samba but the option is considered important
#    enough to be mentioned here
#
# NOTE: Whenever you modify this file you should run the command
# "testparm" to check that you have not made any basic syntactic
# errors.
#======================= Global Settings =======================
[global]
## Browsing/Identification ###
# Change this to the workgroup/NT-domain name your Samba server will part of
   workgroup = WORKGROUP
# server string is the equivalent of the NT Description field
  server string = %h server (Samba, Ubuntu)
# Windows Internet Name Serving Support Section:
# WINS Support - Tells the NMBD component of Samba to enable its WINS Server
#   wins support = no
# WINS Server - Tells the NMBD components of Samba to be a WINS Client
# Note: Samba can be either a WINS Server, or a WINS Client, but NOT both
;   wins server = w.x.y.z
# This will prevent nmbd to search for NetBIOS names through DNS.
   dns proxy = no
#### Networking ####
# The specific set of interfaces / networks to bind to
# This can be either the interface name or an IP address/netmask;
# interface names are normally preferred
;   interfaces = 127.0.0.0/8 eth0
# Only bind to the named interfaces and/or networks; you must use the
# 'interfaces' option above to use this.
# It is recommended that you enable this feature if your Samba machine is
# not protected by a firewall or is a firewall itself.  However, this
# option cannot handle dynamic or non-broadcast interfaces correctly.
;   bind interfaces only = yes
#### Debugging/Accounting ####
# This tells Samba to use a separate log file for each machine
# that connects
   log file = /var/log/samba/log.%m
# Cap the size of the individual log files (in KiB).
   max log size = 1000
# If you want Samba to only log through syslog then set the following
# parameter to 'yes'.
#   syslog only = no
# We want Samba to log a minimum amount of information to syslog. Everything
# should go to /var/log/samba/log.{smbd,nmbd} instead. If you want to log
# through syslog you should set the following parameter to something higher.
   syslog = 0
# Do something sensible when Samba crashes: mail the admin a backtrace
   panic action = /usr/share/samba/panic-action %d
####### Authentication #######
# Server role. Defines in which mode Samba will operate. Possible
# values are "standalone server", "member server", "classic primary
# domain controller", "classic backup domain controller", "active
# directory domain controller".
#
# Most people will want "standalone sever" or "member server".
# Running as "active directory domain controller" will require first
# running "samba-tool domain provision" to wipe databases and create a
# new domain.
   server role = standalone server
# If you are using encrypted passwords, Samba will need to know what
# password database type you are using.
   passdb backend = tdbsam
   obey pam restrictions = yes
# This boolean parameter controls whether Samba attempts to sync the Unix
# password with the SMB password when the encrypted SMB password in the
# passdb is changed.
   unix password sync = yes
# For Unix password sync to work on a Debian GNU/Linux system, the following
# parameters must be set (thanks to Ian Kahan <<kahan@informatik.tu-muenchen.de> for
# sending the correct chat script for the passwd program in Debian Sarge).
   passwd program = /usr/bin/passwd %u
   passwd chat = *Enter\snew\s*\spassword:* %n\n *Retype\snew\s*\spassword:* %n\n *password\supdated\ssuccessfully* .
# This boolean controls whether PAM will be used for password changes
# when requested by an SMB client instead of the program listed in
# 'passwd program'. The default is 'no'.
   pam password change = yes
# This option controls how unsuccessful authentication attempts are mapped
# to anonymous connections
   map to guest = bad user
########## Domains ###########
#
# The following settings only takes effect if 'server role = primary
# classic domain controller', 'server role = backup domain controller'
# or 'domain logons' is set
#
# It specifies the location of the user's
# profile directory from the client point of view) The following
# required a [profiles] share to be setup on the samba server (see
# below)
;   logon path = \\%N\profiles\%U
# Another common choice is storing the profile in the user's home directory
# (this is Samba's default)
#   logon path = \\%N\%U\profile
# The following setting only takes effect if 'domain logons' is set
# It specifies the location of a user's home directory (from the client
# point of view)
;   logon drive = H:
#   logon home = \\%N\%U
# The following setting only takes effect if 'domain logons' is set
# It specifies the script to run during logon. The script must be stored
# in the [netlogon] share
# NOTE: Must be store in 'DOS' file format convention
;   logon script = logon.cmd
# This allows Unix users to be created on the domain controller via the SAMR
# RPC pipe.  The example command creates a user account with a disabled Unix
# password; please adapt to your needs
; add user script = /usr/sbin/adduser --quiet --disabled-password --gecos "" %u
# This allows machine accounts to be created on the domain controller via the
# SAMR RPC pipe.
# The following assumes a "machines" group exists on the system
; add machine script  = /usr/sbin/useradd -g machines -c "%u machine account" -d /var/lib/samba -s /bin/false %u
# This allows Unix groups to be created on the domain controller via the SAMR
# RPC pipe.
; add group script = /usr/sbin/addgroup --force-badname %g
############ Misc ############
# Using the following line enables you to customise your configuration
# on a per machine basis. The %m gets replaced with the netbios name
# of the machine that is connecting
;   include = /home/samba/etc/smb.conf.%m
# Some defaults for winbind (make sure you're not using the ranges
# for something else.)
;   idmap uid = 10000-20000
;   idmap gid = 10000-20000
;   template shell = /bin/bash
# Setup usershare options to enable non-root users to share folders
# with the net usershare command.
# Maximum number of usershare. 0 (default) means that usershare is disabled.
;   usershare max shares = 100
# Allow users who've been granted usershare privileges to create
# public shares, not just authenticated ones
   usershare allow guests = yes
#======================= Share Definitions =======================
# Un-comment the following (and tweak the other settings below to suit)
# to enable the default home directory shares. This will share each
# user's home directory as \\server\username
;[homes]
;   comment = Home Directories
;   browseable = no
# By default, the home directories are exported read-only. Change the
# next parameter to 'no' if you want to be able to write to them.
;   read only = yes
# File creation mask is set to 0700 for security reasons. If you want to
# create files with group=rw permissions, set next parameter to 0775.
;   create mask = 0700
# Directory creation mask is set to 0700 for security reasons. If you want to
# create dirs. with group=rw permissions, set next parameter to 0775.
;   directory mask = 0700
# By default, \\server\username shares can be connected to by anyone
# with access to the samba server.
# Un-comment the following parameter to make sure that only "username"
# can connect to \\server\username
# This might need tweaking when using external authentication schemes
;   valid users = %S
# Un-comment the following and create the netlogon directory for Domain Logons
# (you need to configure Samba to act as a domain controller too.)
;[netlogon]
;   comment = Network Logon Service
;   path = /home/samba/netlogon
;   guest ok = yes
;   read only = yes
# Un-comment the following and create the profiles directory to store
# users profiles (see the "logon path" option above)
# (you need to configure Samba to act as a domain controller too.)
# The path below should be writable by all users so that their
# profile directory may be created the first time they log on
;[profiles]
;   comment = Users profiles
;   path = /home/samba/profiles
;   guest ok = no
;   browseable = no
;   create mask = 0600
;   directory mask = 0700
[printers]
   comment = All Printers
   browseable = no
   path = /var/spool/samba
   printable = yes
   guest ok = no
   read only = yes
   create mask = 0700
# Windows clients look for this share name as a source of downloadable
# printer drivers
[print$]
   comment = Printer Drivers
   path = /var/lib/samba/printers
   browseable = yes
   read only = yes
   guest ok = no
# Uncomment to allow remote administration of Windows print drivers.
# You may need to replace 'lpadmin' with the name of the group your
# admin users are members of.
# Please note that you also need to set appropriate Unix permissions
# to the drivers directory for these users to have write rights in it
; write list = root, @lpadmin[public]
comment = public anonymous access
path = /path/to/share
browseable = yes
writeable = yes
create mask = 0777
directory mask = 0777
guest ok = yes
public = yes


Jika muncul alert seperti ini, kalian login atau masuk atau remote website kalian. Lalu ubah permissions file pada folder kalian.
chmod 777 (folder-sharing-kalian)
Contohnya, disini saya memiliki folder sharing yang berada /mnt/storage/shared seperti gambar di tutorial diatas itu.
lalu maka saya akan memasukan perintah seperti dibawah ini.
chmod 777 /mnt/storage/shared
dan hasilnya ketika kalian sudah memasukan perintah nya, maka kalian sudah bisa sharing file dari windows ke linux ataupun sebaliknya seperti gambar dibawah ini, saya copy-paste kedalam folder sharing linux dan file tersebut berhasil saya paste.
Seperti gambar dibawah ini.

Gimana apakah paham? kalau bingung bisa kontak saya atau ketikan di kolom komentar yaa..😁

Post a Comment for "Cara File Sharing Menggunakan Samba Dari Linux Ke Windows Dan Sebaliknya"
Hai para pembaca setia ataupun yang baru datang.
Semoga artikel di blog ini dapat bermanfaat, silakan berikan komentar, masukan dan kritik baik itu untuk blog ini ataupun artikel diatas.
[PESAN] Bijaklah dalam berkomentar.
1. Berikan komentar yang relevan sesuai dengan artikel di atas.
2. Harap tidak berkata kasar dan dilarang keras berkomentar yang mengandung SARA, menyinggung perasaan atau merugikan orang lain ataupun pihak lain.
3. Jangan tinggalkan link aktif, karena akan menyebabkan broken link.
4. Centang pada Notify me untuk mendapatkan notifikasi jika ada balasan dari komentar.
5. Komentarlah dengan menggunakan akun google atau email valid agar mendapatkan notifikasi balasan, jangan komentar tanpa menggunakan akun.
Silakan kontak admin disini untuk partner atau hal lainnya.
Terima kasih sudah berkunjung.
Salam,
Admin Catatanshand